> ## Documentation Index
> Fetch the complete documentation index at: https://doc.iqqz.com/llms.txt
> Use this file to discover all available pages before exploring further.
# OpenClaw 配置使用 API 教程
## 什么是OpenClaw?
> OpenClaw 是一款开源的个人 AI 助理,支持本地或远程部署,并且是适用于任何操作系统的 AI 智能体网关,支持 WhatsApp、Telegram、Discord、iMessage、飞书、QQ、钉钉等,直接运行在你常用的聊天软件里,发送消息,随时随地获取智能体响应。
参考 [OpenClaw官方中文帮助文档](https://docs.openclaw.ai/zh-CN)
## 安装 OpenClaw
### 第一步:脚本安装(强烈推荐)
☝️ 1. 在终端中运行以下指令将自动安装 OpenClaw ,然后继续下面第二步配置向导:
```sh theme={null}
curl -fsSL https://openclaw.ai/install.sh | bash
```
☝️ 2. 验证 OpenClaw 是否安装成功:
```sh theme={null}
openclaw --version
```
✌️ 1. 在终端中运行以下指令将自动安装 OpenClaw ,然后继续下面第二步配置向导:
> 确保已经安装了 WSL2,在 PowerShell 中运行 WSL 进行以下安装。
```sh theme={null}
iwr -useb https://openclaw.ai/install.ps1 | iex
```
☝️ 2. 验证 OpenClaw 是否安装成功:
```sh theme={null}
openclaw --version
```
### 第二步: 配置 OpenClaw
首先,我们启动交互式配置向导:
```sh theme={null}
openclaw onboard
```
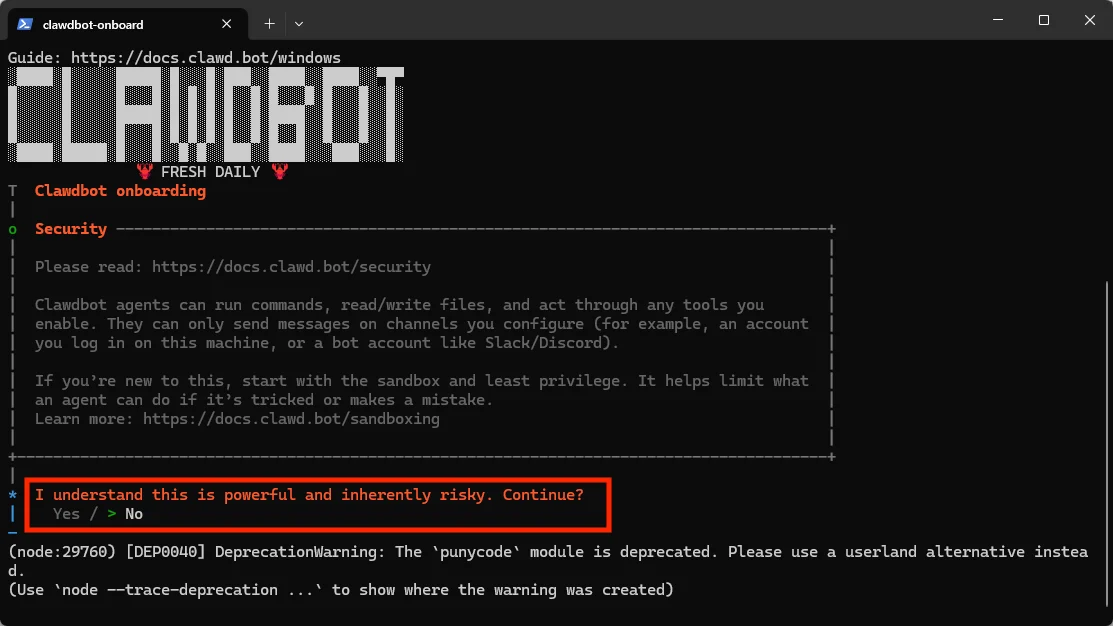 1. 我们直接选择快速开始(QuickStart):
 2. 直接选择 “跳过”(Skip for now)
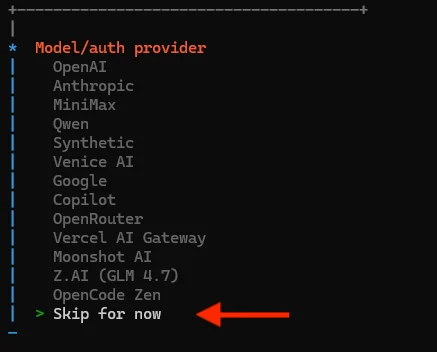 3. 选择 “All providers”
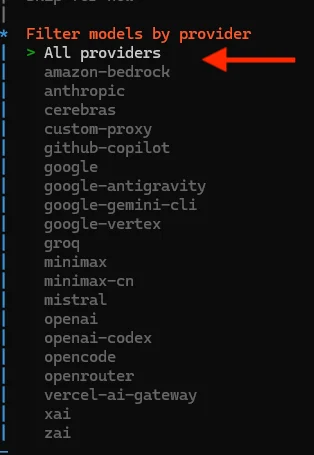 4. 选择 “Keep current”
 5. 聊天工具也可以先选择 “跳过”(Skip for now)
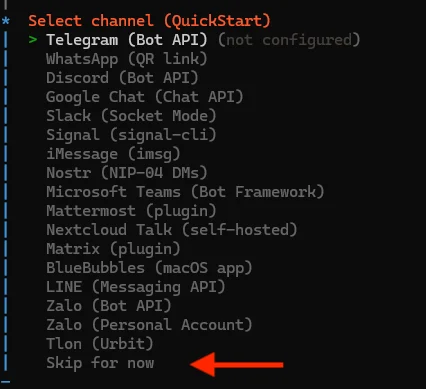 6. 配置 Skills,也可以先选择 “跳过”(Skip for now),用空格键勾选,回车键确认
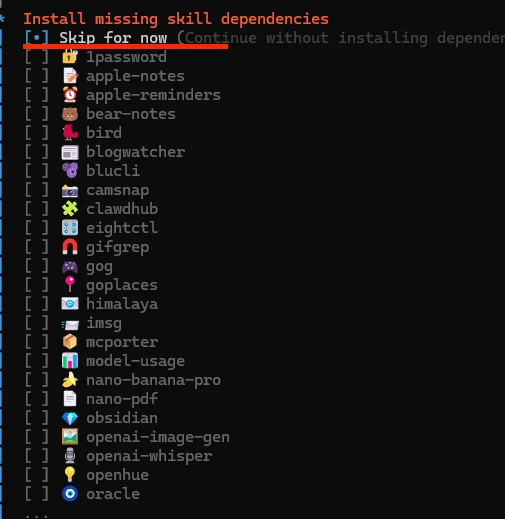 7. 推荐把以下三个选项都选上,如下:
 🎉 恭喜您已经完成了 OpenClaw 的配置向导!
:::tip
OpenClaw 会自动使用默认浏览器打开 OpenClaw 的网关界面,如网关未启动,可使用以下命令启动:
```sh theme={null}
openclaw gateway
```
:::
## OpenClaw接入第三方API接口
### 第三方ApiKey获取
进入网站 [https://api.iqqz.com](https://api.iqqz.com) 进行注册并充值,然后在“令牌管理”页面,复制apikey,后续需要用它来接入Claude code。建议新建令牌->令牌分组选择:`claude_cc`分组,或更便宜的分组,如果选择`claude分组`成本可能很贵。
### 接入第三方ApiKey
完成以上安装后,在 OpenClaw 目录文件夹下,会有一个名为 openclaw\.json 的文件,可在终端输入以下命令直接打开 OpenClaw 目录文件夹:
```sh theme={null}
open ~/.openclaw
```
1. 打开`openclaw.json`文件,配置 OpenClaw 的第三方 API 与模型名称,可复制以下代码,改一下 apiKey 与模型名称 即可,模型可以根据自己需求修改。
2. 推荐vapi的令牌使用`claude_kiro_vip`、`claude_kiro`、`claude_cc`这几个分组,价格相对便宜一些。
:::warning 注意
以下配置中Claude模型的`api`类型选择`anthropic-messages` 才支持模型缓存,走`openai-completions`接口不支持缓存的。
:::
```json theme={null}
{
"agents": {
"defaults": {
"model": {
"primary": "vapi/claude-sonnet-4-6"
},
"models": {
"vapi/claude-sonnet-4-6": {},
"vapi/claude-opus-4-6": {}
}
}
},
"models": {
"mode": "merge",
"providers": {
"vapi": {
"baseUrl": "https://api.iqqz.com/v1",
"apiKey": "sk-xxxxx(复制你的sk-开头的令牌密钥到这里)",
// 走OpenAI接口:openai-completions
// 走Claude接口:anthropic-messages
"api": "anthropic-messages",
"models": [
{
"id": "claude-sonnet-4-6",
"name": "claude-sonnet-4-6",
"reasoning": false,
"input": ["text"],
"cost": { "input": 0, "output": 0, "cacheRead": 0, "cacheWrite": 0 },
"contextWindow": 128000,
"maxTokens": 62000
},
{
"id": "claude-opus-4-6",
"name": "claude-opus-4-6",
"reasoning": true,
"input": ["text"],
"cost": { "input": 0, "output": 0, "cacheRead": 0, "cacheWrite": 0 },
"contextWindow": 128000,
"maxTokens": 62000
}
]
}
}
}
}
```
如果你还要配置机器人信息,可以参考以下Tg的配置:
将这个配置添加到`openclaw.json`文件中即可。
```json theme={null}
"channels": {
"telegram": {
"enabled": true,
"dmPolicy": "pairing",
"botToken": "输入机器人Id",
"groupPolicy": "allowlist",
"streaming": "partial",
// 如果没有群组可删除这个groups块
"groups": {
"输入群组Id": {
"requireMention": false,
"groupPolicy": "open",
"tools": {
"alsoAllow": [
"browser"
]
}
}
},
"streamMode": "partial"
}
},
```
这里`botToken`输入Tg机器人的Id,`groups`对象是配置群组的,需要将机器人先添加到群组中。如果不需要可以删除`groups`对象配置。
2. 保存openclaw\.json配置文件,终端输入以下命令重新启动 OpenClaw:
```sh theme={null}
openclaw gateway restart
```
然后就看到了已配置好的 OpenClaw 的网关界面:
🎉 恭喜您已经完成了 OpenClaw 的配置向导!
:::tip
OpenClaw 会自动使用默认浏览器打开 OpenClaw 的网关界面,如网关未启动,可使用以下命令启动:
```sh theme={null}
openclaw gateway
```
:::
## OpenClaw接入第三方API接口
### 第三方ApiKey获取
进入网站 [https://api.iqqz.com](https://api.iqqz.com) 进行注册并充值,然后在“令牌管理”页面,复制apikey,后续需要用它来接入Claude code。建议新建令牌->令牌分组选择:`claude_cc`分组,或更便宜的分组,如果选择`claude分组`成本可能很贵。
### 接入第三方ApiKey
完成以上安装后,在 OpenClaw 目录文件夹下,会有一个名为 openclaw\.json 的文件,可在终端输入以下命令直接打开 OpenClaw 目录文件夹:
```sh theme={null}
open ~/.openclaw
```
1. 打开`openclaw.json`文件,配置 OpenClaw 的第三方 API 与模型名称,可复制以下代码,改一下 apiKey 与模型名称 即可,模型可以根据自己需求修改。
2. 推荐vapi的令牌使用`claude_kiro_vip`、`claude_kiro`、`claude_cc`这几个分组,价格相对便宜一些。
:::warning 注意
以下配置中Claude模型的`api`类型选择`anthropic-messages` 才支持模型缓存,走`openai-completions`接口不支持缓存的。
:::
```json theme={null}
{
"agents": {
"defaults": {
"model": {
"primary": "vapi/claude-sonnet-4-6"
},
"models": {
"vapi/claude-sonnet-4-6": {},
"vapi/claude-opus-4-6": {}
}
}
},
"models": {
"mode": "merge",
"providers": {
"vapi": {
"baseUrl": "https://api.iqqz.com/v1",
"apiKey": "sk-xxxxx(复制你的sk-开头的令牌密钥到这里)",
// 走OpenAI接口:openai-completions
// 走Claude接口:anthropic-messages
"api": "anthropic-messages",
"models": [
{
"id": "claude-sonnet-4-6",
"name": "claude-sonnet-4-6",
"reasoning": false,
"input": ["text"],
"cost": { "input": 0, "output": 0, "cacheRead": 0, "cacheWrite": 0 },
"contextWindow": 128000,
"maxTokens": 62000
},
{
"id": "claude-opus-4-6",
"name": "claude-opus-4-6",
"reasoning": true,
"input": ["text"],
"cost": { "input": 0, "output": 0, "cacheRead": 0, "cacheWrite": 0 },
"contextWindow": 128000,
"maxTokens": 62000
}
]
}
}
}
}
```
如果你还要配置机器人信息,可以参考以下Tg的配置:
将这个配置添加到`openclaw.json`文件中即可。
```json theme={null}
"channels": {
"telegram": {
"enabled": true,
"dmPolicy": "pairing",
"botToken": "输入机器人Id",
"groupPolicy": "allowlist",
"streaming": "partial",
// 如果没有群组可删除这个groups块
"groups": {
"输入群组Id": {
"requireMention": false,
"groupPolicy": "open",
"tools": {
"alsoAllow": [
"browser"
]
}
}
},
"streamMode": "partial"
}
},
```
这里`botToken`输入Tg机器人的Id,`groups`对象是配置群组的,需要将机器人先添加到群组中。如果不需要可以删除`groups`对象配置。
2. 保存openclaw\.json配置文件,终端输入以下命令重新启动 OpenClaw:
```sh theme={null}
openclaw gateway restart
```
然后就看到了已配置好的 OpenClaw 的网关界面:
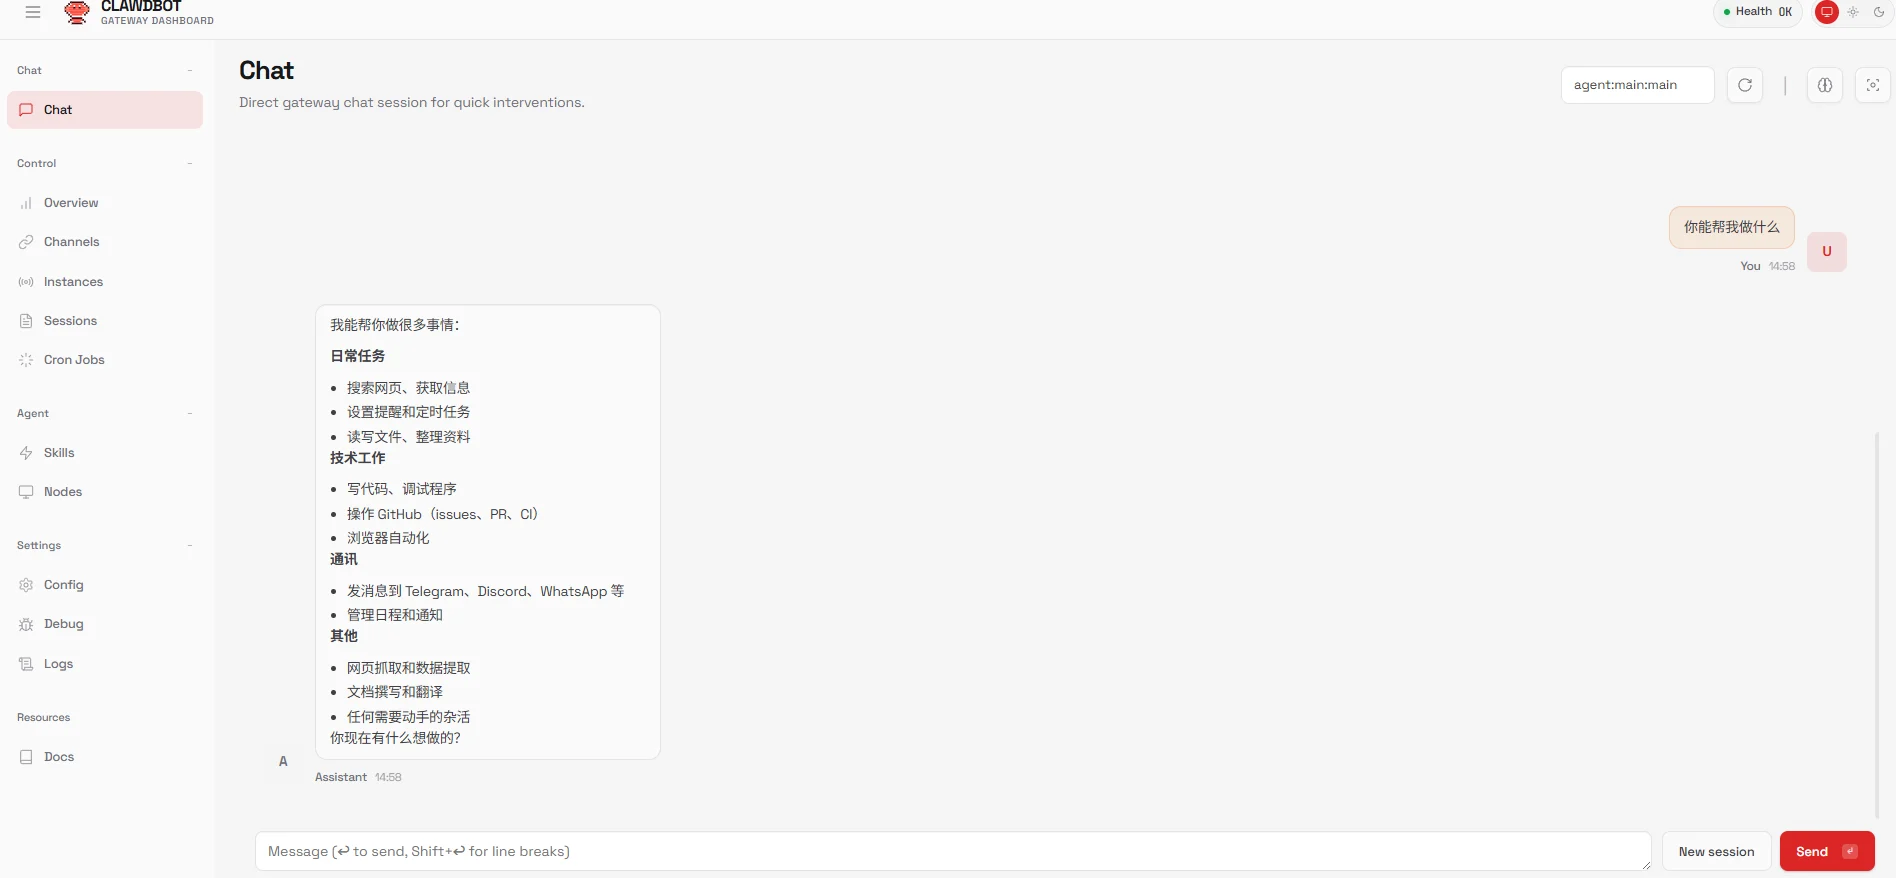 🎉 到这里,我们就已经完成了 OpenClaw 的安装及第三方 API 的配置了。